01304 827609 info@use-ip.co.uk Find us

How to improve night vision on my DS-2CD2135FWD-I camera?

Searcher2

Member
Messages
10
Points
3
Yesterday I installed a Hikvision NVR and camera yesterday to replace a very old Swann system. I only needed one camera and bought the following second hand.

Hikvision DS-7604NI-E1/4P/A NVR and DS-2CD2135FWD-I camera.

I used this forum to update the firmware of the NVR (thanks!), though I haven't managed to update the firmware on the camera yet.

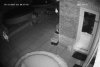
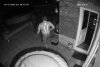
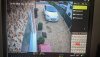
I was very pleased with the image quality compared to the Swann - as I expected to be. However, when it went dark I can't see the car in my drive - which I could on the Swann which was positioned in exactly the same place. I have attached photos of the screen daytime and nighttime. The camera seems to be illuminating the side wall and thus missing the car (apart from number plate). Is this an issue with the location of the camera or are there likely to be settings I can adjust to resolve this issue? Or do I need a different camera? I tried to put a privacy mask over the wall area hoping that the camera would ignore that area altogether but it did nothing.
 

Attachments

  • IMG_20200715_075557.jpg
    IMG_20200715_075557.jpg
    3 MB · Views: 274
  • IMG_20200715_075620.jpg
    IMG_20200715_075620.jpg
    3.3 MB · Views: 295
Last edited by a moderator:
Take a look at this thread for some suggestions:
 
That's a great thread.. thanks. However, when I went into the Image settings I didn't see any of the options that were available in that thread. Is that because it is a low end camera or maybe because the camera firmware needs updating? I am viewing it through IE. Sorry - another newbie.

1594808645598.png
 
@Searcher2 I had a similar problem. Pan the camera slightly right and cover some of the IR LED's (wall side) with waterproof opaque tape. you should find a happy compromise.
 
That's a great thread.. thanks. However, when I went into the Image settings I didn't see any of the options that were available in that thread. Is that because it is a low end camera or maybe because the camera firmware needs updating? I am viewing it through IE. Sorry - another newbie.

View attachment 4123
Some of the image settings we mentioned in the other thread are only available when you log in to the camera itself via its own web page. Firstly you'll need to enable the virtual host feature on the NVR. To do this, on the NVR webpage go to Network > Advanced Settings > Other then check the box "Enable Virtual Host" and save.

Once thats done just open another page in your web browser and append the NVR IP address with the port number. For instance if your NVR is at 192.168.0.100 you'll want to enter http://192.168.0.100:65001 to access the camera directly. Alternatively in the NVR menu you'll notice that once virtual host is enabled, you can go to System > Camera Management and there will be a hyperlink for each camera enabling you to click straight to the camera webpage. Log in to the camera web page with the same details for your NVR.

Only make changes directly in the camera webpage that cannot be made on the NVR webpage. This is to avoid a situation where the NVR menu displays a setting that has been changed in the camera and therefore reads incorrectly.

For that camera, the first thing I would do is pan the camera right to avoid the wall. Yes you'll cover your neighbours property but you can always add a privacy zone if they're unhappy about it.


Brilliant. You have saved me loads of investigation. After doing what you said in your first 2 paragraphs, I could access the camera and updated the firmware. I now get the Day/Night Switch options

1594836575530.png


I am also not sure why I am not getting an image and just get a black box - it says Live View failed. The Hik-Connect app and NVR direct are showing the image fine.

I haven't changed any settings yet but have moved the camera towards the neighbours to see what happens when it gets dark.

My image is now at an angle and don't seem to be able to rotate the lens any more to straighten it up but I can live with that.
 
Brilliant. You have saved me loads of investigation. After doing what you said in your first 2 paragraphs, I could access the camera and updated the firmware. I now get the Day/Night Switch options

View attachment 4127


I am also not sure why I am not getting an image and just get a black box - it says Live View failed. The Hik-Connect app and NVR direct are showing the image fine.

I haven't changed any settings yet but have moved the camera towards the neighbours to see what happens when it gets dark.

My image is now at an angle and don't seem to be able to rotate the lens any more to straighten it up but I can live with that.

Glad you sorted it. Your best bet is to play with the settings when it's darkest and then you can see the effect the various options have in real time to get the best image possible.

I wouldn't worry too much about the live view failed message - it's generally due to web browser/plugin compatibility. Sometimes you'll find you can get the live view in the NVR web GUI but not the camera and vice versa.

With regard to the angle. That model should have a 3 axis gimbal - so as well as tilting and panning the camera to set the view, you can rotate it in position clockwise or anti clockwise to straighten it. There is a stop so if you can't get it straight one way, spin it all the way in the opposite direction. To minimise the effect of the distortion, I always set them so that whatever is in the centre of the image appears correct vertically (balancing any distortion to the left and right of centre)
 
You might want to try putting WDR on - that’s what has worked best for me, it was my thread about the night vision issues
 
Thanks everyone. With regards to the rotating the camera - I had tried that but I discovered it needed a firmer turn to get it to move further round than I had managed to get it. The image is better now and the WDR appeared to work well - though I am going to have another go tonight at it now I have it lined up right.

1594901575937.png
 
I've installed a normal LED floodlight above my cameras, so when they are activated at night, the driveway is lit up and the camera switched from IR to colour which then gives better footage and we can identify the people that little bit better.
 
Thanks again. I will think about putting up an LED floodlight. This is the best I have managed so far at night.

1594936632561.png
 
IR floodlight is better To light up the bottom of your driveway. A normal floodlight is better for closer objects. In either case the brighter the scene, the easier it is to recognise the intruders.

Just a thought, you could turn the camera 90 deg, so the image is portrait, rather than landscape, you might get less IR bounce off the caravan.
 
Lowering the contrast will lighten up the shadows a bit but that’s not far off what I’d expect for that camera. The IR illumination never covers the entire viewing angle and the vignetting is exaggerated by the 2.8mm lens. As dalydesign has said an IR flood would even things up. A standard security flood will also work but the minimum delay from turn on to colour switchover is 5 seconds.
 
When the normal floodlight comes on, it lights up the scene and it throws enough light to sharpen up the image, but the is only suitable for close subjects. an IR floodlight would be better for the distance subjects (but that caravan might cause an issue. So maybe its better to install the IR at the front of your house, then a normal LED next to the camera.

Ive attached 3 images for you to compare at he image quality (excuse the state of the Garden, had to keep the kids entertained during lockdown). The boxes on the floor are quite fuzzy, but when the LED light comes on, even when the camera is in IR mode, the boxes light up and you can see much more detail (but an IR light would be much better). When the camera switches to colour, you can see its much better for identification, but the background is very dark (My LED's are pointing to the ground to light up the immediate area and not pollute the neighbouring houses).

As a note, my footage is quite grainy and only the foreground is visible. This is because I've increased the frame rate and gain to capture the person whilst they're walking around. ...I mean, how often do intruders pause and keep still for you to identify them! lol. ...but this setup works fine for the entrance points of the house. My front door camera and side gate is in colour all night long and set up quite differently..

...and yes, I do normally look that scared when I have to brush huge spiders off the camera!!!!!
 

Attachments

  • Floodlight-OFF.JPG
    Floodlight-OFF.JPG
    566.8 KB · Views: 386
  • Floodlight-ON.JPG
    Floodlight-ON.JPG
    790.6 KB · Views: 260
  • Floodlight-ON-Colour.JPG
    Floodlight-ON-Colour.JPG
    550.1 KB · Views: 259
Last edited:
Thanks again... I won't be able to have a play with it again at night until Sunday when I think I will try to turn it 90 degrees and see if that helps. I did try with WDR on and I don't recall it made much difference. I will try it all again. It's already better than the Swann (no surprise) but there is obviously room for improvement. I do find it strange that the android app is much better than the onboard NVR software for viewing my motion alerts.
 
Thanks again... I won't be able to have a play with it again at night until Sunday when I think I will try to turn it 90 degrees and see if that helps. I did try with WDR on and I don't recall it made much difference. I will try it all again. It's already better than the Swann (no surprise) but there is obviously room for improvement. I do find it strange that the android app is much better than the onboard NVR software for viewing my motion alerts.

The NVR is much better for viewing events than the app it’s just that on that V3 firmware there’s a knack to getting it to display them how you want - though I think it’s better than the newer V4 firmware.

In the playback screen (top left corner from memory) - switch from normal playback to smart. In that screen bottom left corner there are icons for motion draw rectangle, intrusion draw quadrilateral, line crossing draw line. Now if you click one of them and draw a line, area etc then click the search the timeline will show Smart Event markers - retrospectively searching the video (so long as dual VCA is enabled on the camera AND the respective event type is enabled) BUT if you just click an icon and don’t define the line, area etc - the timeline will only show motion, intrusion, line crossings that you’ve set in your pre defined areas. It also works best if you click the gear icon and set it to skip normal playback
 
As a quick update... I did rotate the camera 90 degrees and that, combined with playing with the BLC Area produced a better image. I have a bit of glare off something (top left) but I think a slight physical adjustment of the camera should solve that. So much better than the first image I got - so thanks everyone. I will no doubt dabble some more with it.

1595355087839.png
 
Far better. It's always worth spending a bit of time experimenting with the settings as you've found.
 
A vast improvement, well worth the effort.

I never touched the exposure settings until seeing this post. Now all my cameras are tweaked.
 
Back
Top